How to mount AWS S3 bucket into AWS EC2 instance Step by Step
In this article i will go thru the steps required to mount an AWS S3 Bucket to an Linux EC2 instance. I assume who will follow this article will already have an AWS account setup and knows already what an EC2 & S3 Bucket are.
A - For this you will need to install fuse and s2fs packages
Follow the steps bellow to do this (this was done using a Centos 6.+ Linux Box)#Run as root...
#Install all dependencies
cd /tmp
yum install -y gcc libstdc++-devel gcc-c++ curl-devel libxml2-devel openssl-devel mailcap
#Download the fuse tar file
wget http://pkgs.fedoraproject.org/repo/pkgs/fuse/fuse-2.8.4.tar.gz/a26ec54e410bb826a387947b10c0fd2c/fuse-2.8.4.tar.gz
tar zxvf fuse-2.8.4.tar.gz
cd fuse-2.8.4/ ./configure make make install
echo -e '\n/usr/local/lib' /etc/ld.so.conf
ldconfig
#Download the s3fs tar file
wget http://s3fs.googlecode.com/files/s3fs-1.74.tar.gz
tar zxvf s3fs-1.74.tar.gz
(cd s3fs-1.74/ autoreconf --install export PKG_CONFIG_PATH=/usr/local/lib/pkgconfig ./configure --prefix=/usr make make install)B - After you have installed s2fs & fuse you will need setup the AWS account access.
- run the following commands as the root user.
touch /etc/passwd-s3fs
chmod 640 /etc/passwd-s3fs
C - Next you will need to create and user that will manage your S3 storage.
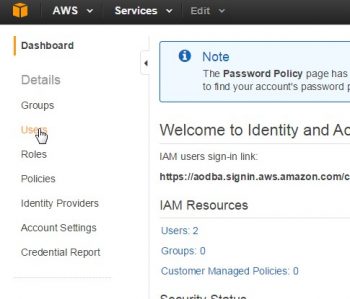
Follow this steps to see how to create a new user that will have S3 Storage administration privileges. 1 - Go to Identity and Access Management Service(IAM)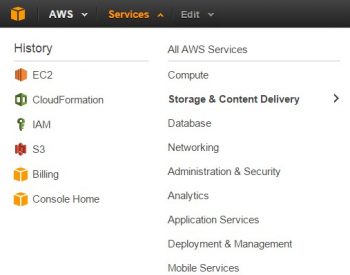 2 - Select the users tab.
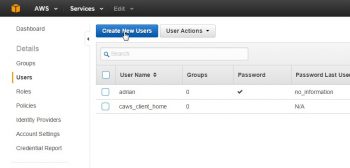
 3 - Choose to create a new user.
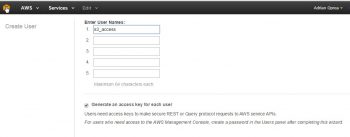
 4 - Give the user a name, i will call it "s3_access", you can call it the way you want.
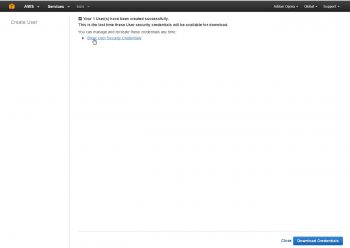
 5 - When the user is created AWS will prompt you with the users credentials.
Very important : save them on your computer or "memorize" them.
5 - When the user is created AWS will prompt you with the users credentials.
Very important : save them on your computer or "memorize" them.
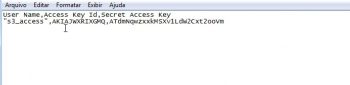
 They look something like this, where you have a column header and their respective values. We only will need the Access Key ID & Secret Access Key.
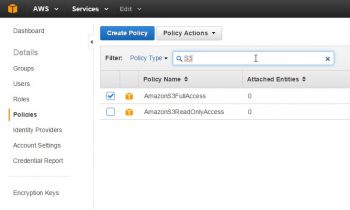
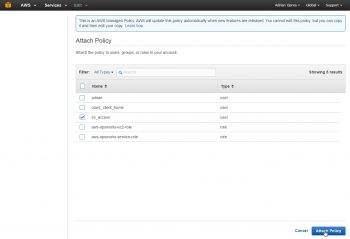
 6 - Setup user policy rights.
- the user was created but is "naked", meaning it has no rights.
- you need to go to the "Policies" tab and look for the AmazonS3FullAccess Policy
- Once selected you need to attach/"grant" the policy to user(in our case the s3_access user).
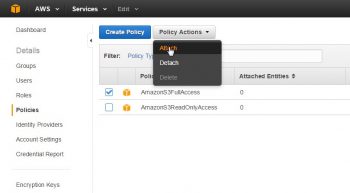
- Select the s3_access user from the list of users and select the button "Attach Policy". Now our s3_access user has full control over our S3 storage resources.
D - Next you need to alter the file and put in your AWS S3 credentials
- just copy and paste the command bellow after you edit the Access Key and the Secret Access Key with your own values from the S3_access user.
echo '<Access Key Id:<Secret Access Key' /etc/passwd-s3fsE - Create mount point
mkdir /s301F - Mount the s3 bucket device on your mount point
/usr/bin/s3fs cf-templates-aghm0qs90bp9-sa-east-1 /s301  -o allow_other -o use_cache=/tmp

#test that is mounted

[root@ip-172-31-34-139 s301]# df -h /s301/
Filesystem Size Used Avail Use% Mounted on
s3fs 256T 0 256T 0% /s301-- See the file system type
[root@ip-172-31-34-139 s301]# df -T /s301
Filesystem Type 1K-blocks Used Available Use% Mounted on
s3fs fuse.s3fs 274877906944 0 274877906944 0% /s301
[root@ip-172-31-34-139 s301]# echo 's3fs#cf-templates-aghm0qs90bp9-sa-east-1 /s301 fuse rw,allow_other,uid=1000,gid=1000 0 2' /etc/fstab-- unmount the device
[root@ip-172-31-34-139 ~]# umount /s301
-- see that we no longer see the device
[root@ip-172-31-34-139 ~]# df -h
Filesystem Size Used Avail Use% Mounted on
rootfs 9.9G 4.2G 5.3G 45% /
/dev/xvdg 7.9G 146M 7.4G 2% /u00
/dev/xvdf 7.9G 146M 7.4G 2% /u01
-- run the mount -a command
[root@ip-172-31-34-139 ~]# mount -a
-- check to see if the s3 device was mounted
[root@ip-172-31-34-139 ~]# df -h
Filesystem Size Used Avail Use% Mounted on
rootfs 9.9G 4.2G 5.3G 45% /
/dev/xvdf 7.9G 146M 7.4G 2% /u01
s3fs 256T 0 256T 0% /s301- nice the device was mounted and this way we validated that it will come up with the bootloader.
